Monday, March 2, 2015
Easy Undeleter
Saturday, March 5, 2011
How to set up a public or private RSS feed for a private Blogger Blogspot
But then, you remember reading an article somewhere that described going private as akin to Blogger Suicide. Apparently without seeing when there are new posts to your blog, your readers eventually get in the habit of just not checking anymore. If only there were a way to make the blog private and still let people know when you publish new posts.
If you're like most people you'll find the email notifications first:
There are a couple of problems with email notifications. First, you are limited to 10 email addresses. Second, did I mention you are limited to 10 email addresses?! Why would anyone write a blog for only 10 people? Needless to say, this isn't a viable option for most people.
This is when geeks get involved and when there's a will, there's a way. Google offers another great service called Feedburner that can help us out. The first thing you'll need to know is where to find the rss feed for private blogs. It's easy, you just need to add /rss.xml to the end of your blog address. So, for example, if your blog is http://myblog.blogspot.com then it's RSS feed URL is http://myblog.blogspot.com/rss.xml
If we go to Feedburner and we put in the now private blog's rss url here's what we see:
Now, there's really nothing stopping you from using your own real personal Gmail credentials in there, but let me just say that I'd rather not have my real credentials sitting in there. Instead, go ahead and create a new Gmail account and send it an invitation to your private blogger blogspot. Be sure not to use special characters in the password because it has to be URL-safe (you get an error "invalid leading or trailing character in the hostname" if you have things besides letters and numbers).
Continuing the example from above and assuming you created a new Gmail account named myrssreader@gmail.com with the password mypass1 then the URL would become http://myrssreader:mypass1@myblog.blogspot.com/rss.xml
After successfully entering your feed into Feedburner it let's you pick a name and URL for the feed:
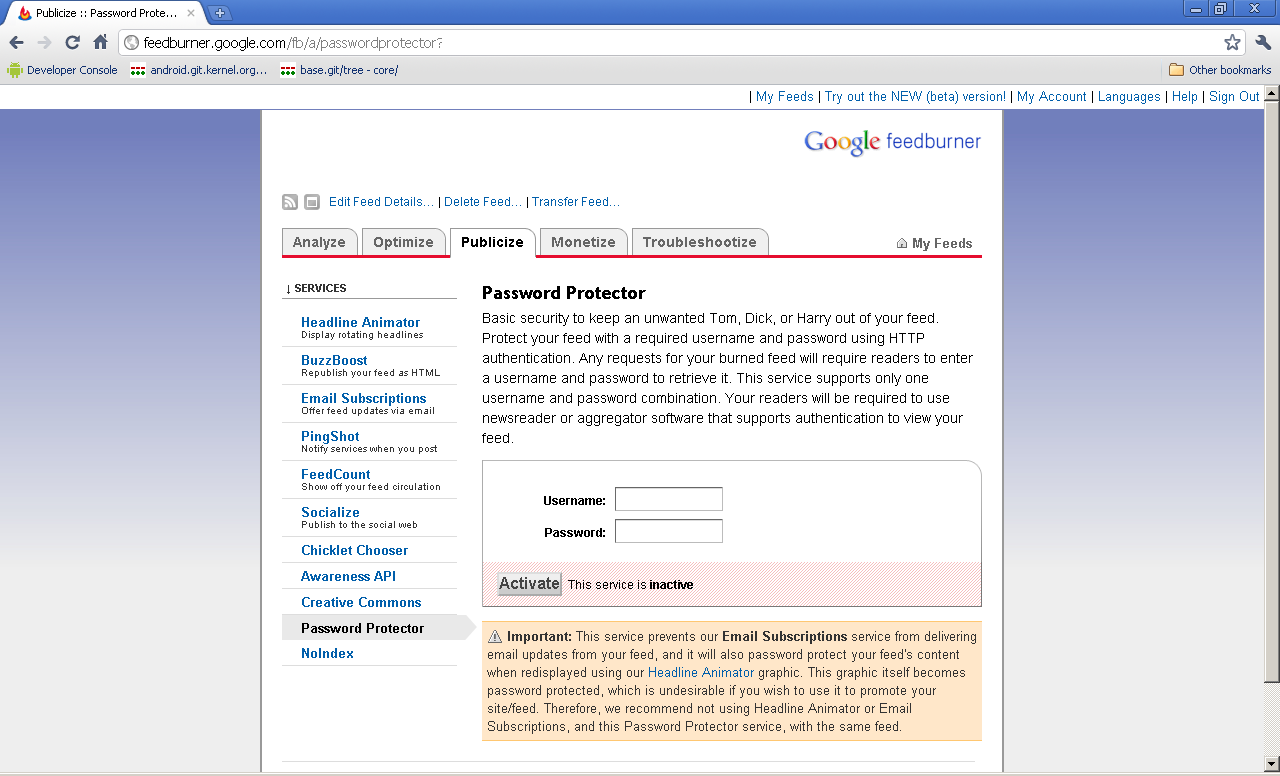
Afterwards it takes you through some options and lets you pick and choose what to turn on for your feed. This is probably a good time to point out that Feedburner also allows you to password-protect your feed under Publicize there is a Password Protector option:
You would have to share that username and password with all of your readers, but it would give you a little more security seeing as the RSS feed is going to contain everything from the blog that you just made private.
Finally, you can go back into Blogger and set the Post Feed Redirect URL Under Settings>Site Feed:
Then, that's it. Tell people they can subscribe to the RSS feed and pass around the Feedburner URL and optionally a username and password for it if you opted into the Password Protector functionality at Feedburner. Now people can see your new posts through your new RSS feed and you (hopefully) won't lose all your readers to going private.
Edit: If you're reading this post and are truly geeky, I went one step further and added the new gmail account to the Email Notification list and pointed Feedburner to the Gmail RSS Feed formatted thusly: https://username:password@mail.google.com/mail/feed/atom for a couple reasons. First, it's using https. Second, The feed that Gmail provides only shows the title and a short snippet from the beginning of the post.
Disclaimer: IMPORTANT: The statements, technical information and recommendations contained herein are believed to be accurate as of the date hereof. Since the conditions and methods of use of the products and of the information referred to herein are beyond our control, Ben expressly disclaims any and all liability as to any results obtained or arising from any use of the products or reliance on such information; NO WARRANTY OF FITNESS FOR ANY PARTICULAR PURPOSE, WARRANTY OF MERCHANTABILITY OR ANY OTHER WARRANTY,EXPRESS OR IMPLIED, IS MADE CONCERNING THE GOODS DESCRIBED OR THE INFORMATION PROVIDED HEREIN.
Saturday, December 18, 2010
Android application permissions
http://online.wsj.com/article/SB10001424052748704694004576020083703574602.html?mod=googlenews_wsj
At least for android, an application's required permissions are displayed while downloading and installing apps. Here is a walkthrough:
http://www.google.com/support/mobile/bin/answer.py?hl=en&answer=168572
Here is a list of permissions developers can request:
http://developer.android.com/reference/android/Manifest.permission.html
The consumer of an app is always presented with a list of permissions before the app is downloaded and installed. It is up to the consumer to read that page and decide how much they trust the developer. Anything that requests access to location, contacts, phone state or phone identity should be scrutinized. Here is a tutorial someone wrote up on the subject:
http://www.brighthub.com/mobile/google-android/articles/91280.aspx
As long as a phone user can read and takes care when they get to the permissions portion of installing an app they won't take any risks they're unaware of. The wsj has tried to sensationalize a topic by claiming users don't know.
If you own an android device just remember to read while you shop for apps and enjoy other's work safely.
Thursday, July 1, 2010
android frf91 what's new
Monday, June 28, 2010
Android 2.2 FRF85B
Thursday, June 24, 2010
FRF83 Official Froyo Update Started June 23
Screenshots to follow in about an hour.
--Update--
I've already noticed lots of new changes. A new darker template for both Gmail and email applications, the browser is noticeably faster, and updated camera application. Something weird happened first reboot after the update- Google Voice disappeared from my home screen (changed to the default icon and said app not installed) so I had to delete it and drag it out from the app drawer again. As promised, here are some screenshots:


Thursday, May 27, 2010
Goo.gl URL Shortening Call
Tuesday, May 25, 2010
Android Market Update WoL Wake On Lan Wan Now Available
- Multiple Profiles - It can store as many as your external storage can handle. Saving the profiles on the external storage also allows the user to share profiles with other phones if desired. Just look in the WoLANWAN directory and copy any .dat file to another phone's similarly named directory to share a profile (I use Astro for my Android File Explorer needs)
- Profile Grouping - Want one widget for both your WiFi and WAN configurations for the same computer? Now you can group them and create a group widget that sends packets to all the computers in the group. Have a data center with loads of computers? Group them and wake up your entire data center with one touch.
- IP and Domain Support - Not everyone has a dedicated external IP for WoW and so they turn to dynamic DNS like dyndns.org to provide a fully-qualified domain name that resolves to their machine. On the other hand when using WoL on an intranet there's probably no need for domain name because the IP is fixed or known.
- UDP Ports 0-65535 - OK, I didn't test ALL of them but, I did test a non-standard port for my own implementation and it worked like a champ. Why limit a user to 7 or 9? You know what your firewall needs!
- Toggle Broadcast - With the ability to turn broadcast on for profiles to use while connected to WiFi and turn it off for profiles to use while connected to 3G/Edge/G etc WoL Wake on Lan Wan has you covered.
- Send Multiple Packets - It's UDP... meaning connectionless. Packets can lose their way sometimes in the internet, so sending a configurable number of packets at a configurable interval is a great way to make sure the message gets to the remote computer. This is also great for testing your router and machine configurations (I use a tool called Wake On Lan Monitor).
- One-Touch Widgets - Do I really have to open the application and pick a profile every time I want to wake up my computer? No! Of course not, we know how lazy... er.. busy you are so with One-Touch Widgets you can save your precious energy. This is also really handy if you have loads of profiles and frequently use one at the bottom of the list.
- Sorting - With a bunch of different profiles, it's nice to be able to see them alphabetically, or reverse alphabetically, or more recently changed - you get the idea.
- Localization - The application is now localized in French and Spanish... very poorly. If you would like to submit a change to some of the poorly localized UI feel free to email me or leave a comment on my blog here. Also, if we're not localized in the language that you're interested in please email me so that I can give you a list of strings to translate.
- CSV Export and Import - As wonderful and amazing as phones are, it sure is a pain to type on them. That's why with the new CSV export and import you can export a sample and then type a bunch of them in from a computer. Import the new CSV and voila no need to peck away on your phone for hours on end. For those of you who may be having trouble here is the order the columns should be in the CSV: Name, MAC, IP or Domain Name, UDP Port, Broadcast ("true" or "false"), Subnet Mask, Send Multiple ("true" or "false"), Packet Count, Interval (seconds). Also, please note that every column must be filled with a value.
- Tasker task export - But wait, there's more! I finally had a chance to purchase Tasker (cool app!) and added a Tasker export to the context menu (long-press) in the main screen. You can also create it yourself by using the Action Intent in Misc. The settings are Action=com.benfinnigan.wol.widgetlaunch Cat=Launcher Extra=CPATH:<Enter the name of the profile or group profile here>
- NO ADVERTISING - Seriously? For something as simple as a wake on lan app, no one wants to be bothered by ads.
Friday, May 21, 2010
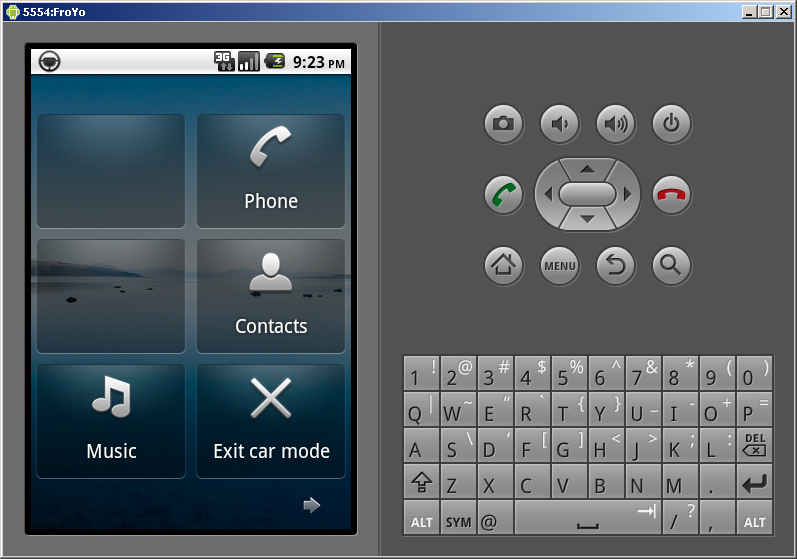
New Car Dock Screen in Android 2.2 (froyo)
While looking through the Froyo Emulator I found something else interesting. It looks like the card dock screen has been changed as well.
It looks like there is a difference between a day and night mode (and automatic which I assume senses ambient light to determine screen brightness). There are a lot of empty slots which I assume we can get custom shortcuts into, but I haven't figured out how yet.
Here are some screenshots:
Thursday, May 20, 2010
New Pin and Password Screen Lockout in Android 2.2 (FroYo)
While everyone else is out tooting their horns excitedly about tethering built into the new Android 2.2 (Froyo) release I've found something else to get excited about.
That pattern screen lock was a real deal-breaker for even enabling screen locking on my Nexus One because I didn't see much point. Anybody with enough time could look at the grease lines on the screen and come up with a likely pattern. Thankfully, it looks like Android 2.2 (Froyo) has PIN and Password screen locking options (why wasn't this in there at the beginning?). Anyway, here are some screen shots from the emulator:
Tuesday, March 31, 2009
Label Tags
Notice how you can change your selection by clicking the text describing the option? Here is the same example without labels:
0-25yrs
26-45yrs
45+yrs
Friday, November 28, 2008
Super-Sharable, Self-Installing Widget
<form id="supersharingwidget" action="http://www.blogger.com/add-widget" method="post"><!-- This is the beginning of the real widget content /--><a href="http://petitelefant.blogspot.com"><img border="0" src="http://img81.imageshack.us/img81/5783/elefantsc0.gif"/></a><br/>
<div>To add this button to your blog, copy and paste the text below into the HTML/JavaScript page element on your blog or simply press the button below.<br/><textarea onclick="this.select()"><a href="http://petitelefant.blogspot.com"><img border="0" src="http://img81.imageshack.us/img81/5783/elefantsc0.gif"/></a><br/></textarea> </div><!-- This is the end of the real widget content /--><input value="http://petitelefant.blogspot.com/" name="infoUrl" type="hidden"/> <input name="widget.title" type="hidden"/> <!-- Do Not Change anything below this line /--><input id="pewc" name="widget.content" type="hidden"/> <input value="<data:content/>" name="widget.template" type="hidden"/> <input style="border: 0px none ; background: rgb(255, 255, 255) url(http://www.blogger.com/img/add/add2blogger_sm_b.gif) repeat scroll center center; width: 104px; height: 17px; -moz-background-clip: -moz-initial; -moz-background-origin: -moz-initial; -moz-background-inline-policy: -moz-initial;" value=" " onclick="var wc = (document.getElementById('supersharingwidget').outerHTML)?document.getElementById('supersharingwidget').outerHTML + '<!--endssw/-->':document.getElementById('supersharingwidget').parentNode.innerHTML.match(/<form id=\u0022supersharingwidget\u0022(.|\n)+<\!--endssw\/-->/)[0].toString();document.getElementById('pewc').value = wc" type="submit"/> </form><!--endssw/-->
Tuesday, November 25, 2008
Count Controls in a Page in C#
int ControlCount( Control parentControl )
{
int current=0;
foreach( Control c in parentControl.Controls )
{
if (c.Controls.Count > 0)
{
current += ControlCount(c);
}
else
{
current++;
}
}
return current;
}
Thursday, November 13, 2008
WOL Wake On LAN
If you're a computer geek Wake On LAN is functionality supported either by your motherboard or your operating system and your NIC (Network Interface Card - this is what you use for your Internet Connection) that listens for special packets called Magic Packets that it then uses to power on or wake up from a non-interactive state.
Wake On LAN can wake up windows from sleep (s3) or hibernate (s4) but you're looking for motherboard support if you want to power on your computer from a shut down state (s5). What are those s numbers?
First go to Start>Control Panel>Network Connections. There should be a default one named Local Area Connection. Right-click this icon and choose Status. The choose the Support tab. Then click the Details button. Write down your Physical Address (This is your MAC Address) and Subnet Mask.
If you're doing it from a command prompt I'm going to assume you know what one is and how to launch it etc etc. The command you want to type in is ipconfig /all and you will see information about the various NICs installed in your computer. Look for Ethernet adapter Local Area Connection: as this is the default for a windows internet connection and find the Physical Address (something like 00-00-00-00-00-00), and the Subnet Mask (something like 255.255.255.0).
Monday, November 10, 2008
WOL - Wake On LAN through Linksys router

I wanted to be able to turn on my computer at home without having to call my dear wife and ask her to march downstairs and fire it up. Here are the steps that I performed to make it work:
- Prep the NIC Card: Start>Control Panel>Network Connections>Local Area Connection>Properties>Configure> Then looked around for Wake Up, Wake On LAN, settings under the advanced tab and made sure that everything was enabled for magic packets.
Then I went into the power management tab and unchecked the "Allow the computer to turn off this device to save power" checkbox. - Prep the Motherboard: While my computer is booting I see the Dell logo and some text about how to get into settings or BIOS (typically F2 or F10 or F something). Once I was inside the BIOS I looked around for settings in regard to Wake on LAN sometimes abbreviated WOL. I made sure that WOL was enabled.

- Prep the Routers: This is where it gets interesting. Linksys doesn't natively support forwarding ports to the broadcast IP of 255 (you get some JavaScript error "IP value is out of range [0 - 254]"), so to get around it you can try one of two methods (they both worked for me):
1) I used firefox and DOM Inspector to change the value of the IP for port forwarding thereby circumventing the Javasacript validation. You have to have DOMI installed in Firefox, then inspect the page with the port forwarding for applications and gaming, then right-click the value in DOMI, choose edit, and set it to 255. After that is complete just save the settings.
2) I also tried saving the html page and modifying the form manually. This also worked like a charm. You need to remember to change the action property of the form to prepend the url of the router. If your router was 192.168.1.1 then your form tag might be <form name="portRange" action="http://192.168.1.1/PortRange.tri" method="post"> assuming PortRange.tri was what you orginally found in the form. You also need to change the value of the IP you're forwarding to be 255. This is what my HTML looked like when I was done:
<input class="num" onblur="check_valid_value(this,0,254,errmsg.err34,this.defaultValue,lanip,networkip,broadcastip)" maxlength="3" size="3" value="255" name="ip1">
On the VOIP router I just forwarded the port I decided to use as the Linksys WRT54G which forwards to the broadcast on my LAN.
Wait, what UDP port am I forwarding you ask? It doesn't really matter. Typically WOL is on 7 or 9 but as long as you pick a port that isn't being used by another application (in other words pick something really high) then you're probably just fine. - Test the setup: So, to test the Wake on LAN settings I used this WOL monitor and wrote my own application for sending packets. Why would I write my own packet sender? Because I couldn't find one out there that didn't apply the subnet mask to the IP and broadcast the message. With my setup I wanted the packet to go directly to my VOIP router, so I built my own WOL application. It's pretty simple:

If you're having a hard time getting WOL to work for you, then try this forum to get your particular issue sorted out.

Disclaimer: The views expressed in this blog entry are provided "as-is" with no guarantee expressed or implied. If tweaking this stuff bricks your box or your router I'm not responsible. Any sites I've linked to are not to be construed as an endorsement and I cannot be held responsible for anything that goes on within other internet sites and their products or forums.
Tuesday, November 4, 2008
Where is settings.settings user.config?
Thursday, October 2, 2008
VBScript Adding Large Hex Strings
Function HexAdd(ByVal strNum1, ByVal strNum2)
size1 = Len(strNum1)
size2 = Len(strNum2)
If (size1 <> size2) Then
If (size1 > size2) Then
strNum2 = String(size1 - size2, "0") + strNum2
size2 = size1
Else
strNum1 = String(size2 - size1, "0") + strNum1
size1 = size2
End If
End If
' Begin adding
Dim i
Dim ret
Dim carry
Dim sum
ret = ""
i = CDbl(0)
carry = 0
For i = 1 To size1 '199999999999999999999998
a = "&H" & CStr(Mid(strNum1, size1 - i + 1, 1))
b = "&H" & CStr(Mid(strNum2, size1 - i + 1, 1))
sum = CInt(a) + CInt(b) + carry
ret = Hex(CStr(sum Mod 16)) & ret
carry = Fix(sum / 16)
Next
If (carry > 0) Then
ret = CStr(Hex(carry)) & ret
End If
HexAdd = ret
End Function
Call it like this:
ret = HexAdd("FFFFF", "123456789ABCDEF")
Wednesday, October 1, 2008
Handling Large Hex in VBScript
Function HexToDec(strHex)
Dim i
Dim size
Dim ret
size = Len(strHex) - 1
ret = CDbl(0)
For i = 0 To size
ret = ret + CDbl("&H" & Mid(strHex, size - i + 1, 1)) * (CDbl(16) ^ CDbl(i))
Next
HexToDec = ret
End Function
Function DecToHex(dblNumber)
Dim Q
Dim ret
ret = ""
Q = CDbl(Fix(dblNumber))
While Q > 0
ret = Hex(Q - Fix(Q / 16) * 16) & ret
Q = Fix(Q / CDbl(16))
Wend
DecToHex = ret
End Function
Called like this:
ret = HexToDec("0C0BA715B2223D47A8CAC87BE5D9679")
ret = DecToHex(CDBL(16843216856846468461654862))
Big Progressive is Watching
They assure the consumer that unless legally obligated they will keep the information about your driving style to themselves, but I'm guessing it won't be long before the culpable driver in accidents will be determined with a device such as these. Beware consumer - Big Progressive is watching!
http://progressive.com/myrate/
Wednesday, September 24, 2008
Male Chauvinist Pigs Make More Money?
Men With Traditional Views on Sex Roles Earn More Money
Isn't that interesting? The comments at the bottom gave some interesting ideas as to why there may be a correlation.
I would question whether it's just a simple issue of age of theology, because older individuals tend to have more traditional beliefs and they tend to be further along in their career hence making more money. I wonder what the trend will look like in about 50-60 years.