Showing posts with label Blogger. Show all posts

Saturday, March 5, 2011

How to set up a public or private RSS feed for a private Blogger Blogspot

So, you've been looking at Google Analytics for your personal blog lately and you can't help but wonder "who is from Thailand that keeps looking at my blog?"  In the end, you decide it's time to wrap just a little more security around your blog and "go private"


But then, you remember reading an article somewhere that described going private as akin to Blogger Suicide.  Apparently without seeing when there are new posts to your blog, your readers eventually get in the habit of just not checking anymore.  If only there were a way to make the blog private and still let people know when you publish new posts.

If you're like most people you'll find the email notifications first:


There are a couple of problems with email notifications.  First, you are limited to 10 email addresses.  Second, did I mention you are limited to 10 email addresses?!  Why would anyone write a blog for only 10 people?  Needless to say, this isn't a viable option for most people.

This is when geeks get involved and when there's a will, there's a way.  Google offers another great service called Feedburner that can help us out.  The first thing you'll need to know is where to find the rss feed for private blogs.  It's easy, you just need to add /rss.xml to the end of your blog address.  So, for example, if your blog is http://myblog.blogspot.com then it's RSS feed URL is http://myblog.blogspot.com/rss.xml

If we go to Feedburner and we put in the now private blog's rss url here's what we see:


Now, there's really nothing stopping you from using your own real personal Gmail credentials in there, but let me just say that I'd rather not have my real credentials sitting in there.  Instead, go ahead and create a new Gmail account and send it an invitation to your private blogger blogspot.  Be sure not to use special characters in the password because it has to be URL-safe (you get an error "invalid leading or trailing character in the hostname" if you have things besides letters and numbers).

Continuing the example from above and assuming you created a new Gmail account named myrssreader@gmail.com with the password mypass1 then the URL would become http://myrssreader:mypass1@myblog.blogspot.com/rss.xml

After successfully entering your feed into Feedburner it let's you pick a name and URL for the feed:


Afterwards it takes you through some options and lets you pick and choose what to turn on for your feed.  This is probably a good time to point out that Feedburner also allows you to password-protect your feed under Publicize there is a Password Protector option:
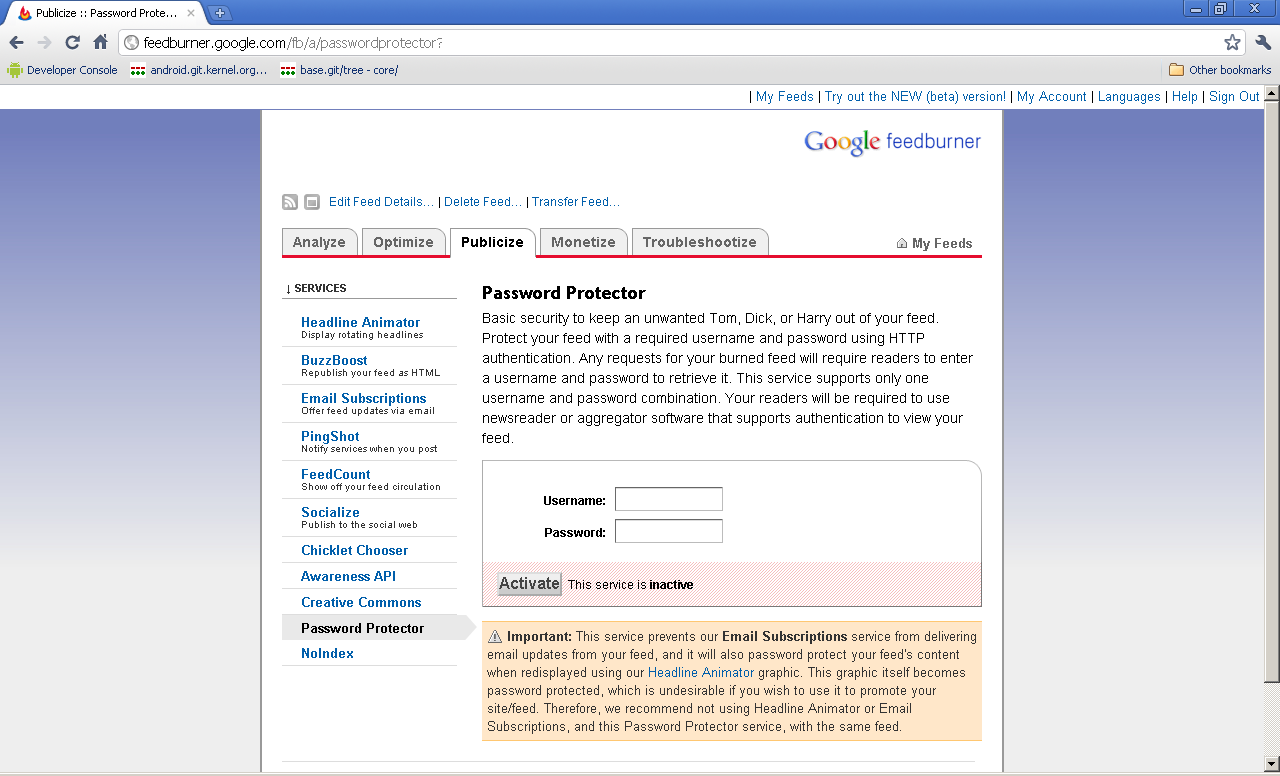

You would have to share that username and password with all of your readers, but it would give you a little more security seeing as the RSS feed is going to contain everything from the blog that you just made private.

Finally, you can go back into Blogger and set the Post Feed Redirect URL Under Settings>Site Feed:


Then, that's it.  Tell people they can subscribe to the RSS feed and pass around the Feedburner URL and optionally a username and password for it if you opted into the Password Protector functionality at Feedburner.  Now people can see your new posts through your new RSS feed and you (hopefully) won't lose all your readers to going private.


Edit:  If you're reading this post and are truly geeky, I went one step further and added the new gmail account to the Email Notification list and pointed Feedburner to the Gmail RSS Feed formatted thusly: https://username:password@mail.google.com/mail/feed/atom for a couple reasons.  First, it's using https.  Second, The feed that Gmail provides only shows the title and a short snippet from the beginning of the post.


Disclaimer:  IMPORTANT: The statements, technical information and recommendations contained herein are believed to be accurate as of the date hereof. Since the conditions and methods of use of the products and of the information referred to herein are beyond our control, Ben expressly disclaims any and all liability as to any results obtained or arising from any use of the products or reliance on such information; NO WARRANTY OF FITNESS FOR ANY PARTICULAR PURPOSE, WARRANTY OF MERCHANTABILITY OR ANY OTHER WARRANTY,EXPRESS OR IMPLIED, IS MADE CONCERNING THE GOODS DESCRIBED OR THE INFORMATION PROVIDED HEREIN.

Friday, November 28, 2008

Super-Sharable, Self-Installing Widget

There are not many people that will appreciate this, but I just finished coding up a widget form that will install itself on other blogger blogs automatically. Then after it's been installed on someone else's blog it contains the same form so that their readers can add the widget. See it in action on my sidebar for the petit elefant. Here's the code:

<form id="supersharingwidget" action="http://www.blogger.com/add-widget" method="post"><!-- This is the beginning of the real widget content /--><a href="http://petitelefant.blogspot.com"><img border="0" src="http://img81.imageshack.us/img81/5783/elefantsc0.gif"/></a><br/>
<div>To add this button to your blog, copy and paste the text below into the HTML/JavaScript page element on your blog or simply press the button below.<br/><textarea onclick="this.select()">&lt;a href="http://petitelefant.blogspot.com"&gt;&lt;img border="0" src="http://img81.imageshack.us/img81/5783/elefantsc0.gif"/&gt;&lt;/a&gt;&lt;br/&gt;</textarea> </div><!-- This is the end of the real widget content /--><input value="http://petitelefant.blogspot.com/" name="infoUrl" type="hidden"/> <input name="widget.title" type="hidden"/> <!-- Do Not Change anything below this line /--><input id="pewc" name="widget.content" type="hidden"/> <input value="&lt;data:content/&gt;" name="widget.template" type="hidden"/> <input style="border: 0px none ; background: rgb(255, 255, 255) url(http://www.blogger.com/img/add/add2blogger_sm_b.gif) repeat scroll center center; width: 104px; height: 17px; -moz-background-clip: -moz-initial; -moz-background-origin: -moz-initial; -moz-background-inline-policy: -moz-initial;" value=" " onclick="var wc = (document.getElementById('supersharingwidget').outerHTML)?document.getElementById('supersharingwidget').outerHTML + '<!--endssw/-->':document.getElementById('supersharingwidget').parentNode.innerHTML.match(/<form id=\u0022supersharingwidget\u0022(.|\n)+<\!--endssw\/-->/)[0].toString();document.getElementById('pewc').value = wc" type="submit"/> </form><!--endssw/-->

Thursday, June 19, 2008

Blogger Blogspot Pages scroll too much

OK, so, I just realized it's entirely possible some people have absolutely no idea why I went to the effort of making the posts script and the sidebar widget. It's simple really, when I read other peoples' blogs I find myself scrolling around like crazy. I hate scrolling, so I decided to come up with a solution to the problem rather than just complain about it.

Now, on this blog, you'll likely still do some scrolling (especially on long posts); however, you won't do as much with the navigation scripts place. It's kind of like tab-navigation for your blog.

http://blog.benfinnigan.com/2008/06/blog-post-navigation-script.html

http://blog.benfinnigan.com/2008/06/interesting-sidebar-widget.html

Blog Post Navigation Widget

I went ahead and tweaked out my sidebar navigation code to provide similar functionality for blog posts.

Here's the code:

<!-- BlogPostNav Widget By Benfinnigan.com /-->
<style type="text/css">
.postnavbutton {
cursor: pointer;
cursor: hand;
margin: 1px;
padding: 2px;
background-color: #ffffff;
color: #000000;
border-style: solid;
border-width: 1px 2px 2px 1px;
border-color: #C0C0C0 #000000 #000000 #C0C0C0;
}
.postnavbutton:hover
{
cursor: pointer;
cursor: hand;
margin: 1px;
padding: 2px;
background-color: #dddddd;
color: #000000;
border-style: solid;
border-width: 2px 1px 1px 2px;
border-color: #000000 #C0C0C0 #C0C0C0 #000000;
}
</style>
<script src="http://benfinnigan.com/js/blogpostnav.js" type="text/javascript"></script>
<!-- End BlogPostNav Widget By Benfinnigan.com /-->

Please give me a link back if you swipe the code and please let me know if you find errors.

Sidebar Navigation Widget


So, I just finished up a little sidebar navigation widget that helps de-clutter the ole blog.

Here's the code:

<!-- Sidebar Nav Widget By Benfinnigan.com /-->
<style type="text/css">
.sidebarnavbutton {
cursor: pointer;
cursor: hand;
margin: 1px;
padding: 2px;
background-color: #ffffff;
color: #000000;
border-style: solid;
border-width: 1px 2px 2px 1px;
border-color: #C0C0C0 #000000 #000000 #C0C0C0;
}
.sidebarnavbutton:hover
{
cursor: pointer;
cursor: hand;
margin: 1px;
padding: 2px;
background-color: #dddddd;
color: #000000;
border-style: solid;
border-width: 2px 1px 1px 2px;
border-color: #000000 #C0C0C0 #C0C0C0 #000000;
}
</style>
<script type="text/javascript">
//<!--
var sidebarid = 'sidebar';
var widgetClassPrefix = 'widget ';
var widgetClassDisqualifier = 'draggable-widget';
var blnsidebaraccordion = true;
// /-->
</script>
<script src="http://benfinnigan.com/js/sidebarnav.js" type="text/javascript"></script>
<!-- End Sidebar Nav Widget By Benfinnigan.com /-->

To add the sidebar navigation widget to your blog follow these steps:


If you play with it, please give me a link on your blog somewhere. If you find errors, please feel free to post a comment.